A couple of people have e-mailed me asking about my design process. I tried to put a small documentation together, but I want to point out that my process is always a little different every time, but follows some basic ground rules. Additionally, what I talk about might sound a little complicated but everything makes a lot of sense for me after using it for the past years.
Shirts are also different to the usual illustration I make. They have to have less than eight colors because if they get chosen they will be screenprinted. Therefor, the work process has to be advantageous for color separation - before you hand in the file to the people who produce your shirt, you have to have every color on a separate layer (in Photoshop in my case).
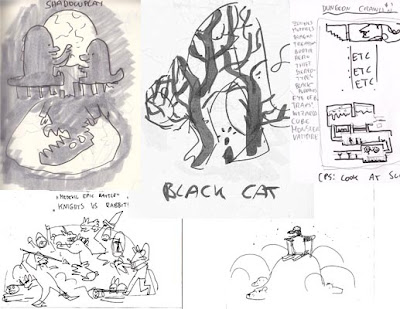
Anyway, let's start. One of the most important things to me is the concept doodle. I think I have never done a design without roughly doodeling it out first. This is vital to accomplish a good composition and to realize if the joke is working on a visual level. I started to hang doodles up my wall and let them sit there for weeks, sometimes month. Ideas which still seem good after a longer time are usually good ideas. Bad ideas seem silly the next day and land in the paper basket.
(Below: This is how my shirts start; As rough drawings, barely readable to anybody but me. But they usually capture composition and mood better than the final pencil sketch)
Shirts are also different to the usual illustration I make. They have to have less than eight colors because if they get chosen they will be screenprinted. Therefor, the work process has to be advantageous for color separation - before you hand in the file to the people who produce your shirt, you have to have every color on a separate layer (in Photoshop in my case).
Anyway, let's start. One of the most important things to me is the concept doodle. I think I have never done a design without roughly doodeling it out first. This is vital to accomplish a good composition and to realize if the joke is working on a visual level. I started to hang doodles up my wall and let them sit there for weeks, sometimes month. Ideas which still seem good after a longer time are usually good ideas. Bad ideas seem silly the next day and land in the paper basket.
(Below: This is how my shirts start; As rough drawings, barely readable to anybody but me. But they usually capture composition and mood better than the final pencil sketch)

(Below you see one of my fevorite ideas from doodle to finish. I have a liitle sketchbook in my bag and fill it with little ideas like this. Usually I realize a good idea as a good idea pretty quickly, while bad ideas seem bad really soon as well)

From the doodle, I start sketching a detailed pencil sketch, usually on a pretty big-sized paper, usually A2 (I don't know that in US-size). It's important for me to draw big, so I can draw details without going crazy. The pencil sketch is usually really dirty, has some mistakes in it - but basically I try to draw it as correct as possible to have an easy time inking it. For inking, I use super smooth paper so the multiliner has no interruptions in the line quality. I fix it on top of the pencil sketch with paper clips and trace it on top of a "Light Tracer 2" light box which I bought at Blick Art. It took me a long time to figure out what fine liners to use, but my favorites at the moment are Copic Multiliners (the none-refillable ones) from size 0.5 up and from size 0.1 to 0.5 my favorite are Pigma Microns. Why? Because I have a strong grip and I need pens that can withstand my impatient hand good. And the pens mentioned above are pretty good at that.

The outlines for my shirt designs don't require to be perfect. Important is that all lines are closed, and that I use a fine pen, such as a Micron 0.5. The linework should be clean and clear. I will explain a little more by using my latest design "Exposed!" as an example.

As you can see, all outlines are very clear. The drawing itself isn't perfect, but I usually try to correct errors during the coloring phase. Using the outlines+Magic Wand in Photoshop, I lay out the basic ground color for the design; Shirt color (which I take from Threadless's shirt templates), in this case Navy. I don't always know what shirt color to use from the beginning. Sometimes I change it last second. But let's just assume I knew what I was doing from the beginning here.....which I didn't haha.

As you can see in the picture above, I put all the basic colors on one layer to reduce complexity. I only separate colors at the very end, once I know I'm getting printed, otherwise I don't bother. However, the assumption that one has to do the color separation later should be in your mind all the time so it's easy later.
SO once I'm kinda satisfied with the ground colors (which is usually 2-4 different shades of the shirt color and maybe one poppy color, like the red in this case) I start using textured brushes for a more 3D-traditional effect.
SO once I'm kinda satisfied with the ground colors (which is usually 2-4 different shades of the shirt color and maybe one poppy color, like the red in this case) I start using textured brushes for a more 3D-traditional effect.

I would go too far if I tried to give you a tutorial on brushes here. Basically, I have one favorite brush which I got from a teacher at FIT a year ago. I use it all the time, and play around with the settings a lot. The most important settings for textured brushes for me are Scattering -> play around with the scattering and Texture -> apply texture to brush and play around with depth and size. One of the things to keep in mind is to not use different transparencies/opacity on the brush, as that doesn't work in screen print. But this is a whole other chapter.....

The basic thing I do is, use the darkest color as a texture in the brighter color and vise versa. That creates the effect of more colors and volume and shading. It's hard to explain. I hope you know what I mean. I keep all differently colored textures on different layers because color separation is not easy with textured colors. I use layer effects such as "Overlay-> color" to try out different colors.
When I am kinda satisfied, I mock the design up with one of the shirt templates I have to put it up for voting at Threadless.

I know this sounds probably all kinda complicated. But I hope I could give a little insight on my process. If I confused you more, I apologize.
15 comments:
Very instructive, especially that secret texturing thingy part you've already mentioned in another post. And by the way, a happy new year filled with little ninja's knights and many more winna's! ;^)
Thanks Victor, I am glad you like my post!
Wow, this is great stuff. Thanks so much for taking the time to break down your process. I love your work!
No problem, thanks for reading it....
great! I enjoyed a lot to discover your secrets, amazing blog process!
I enjoyed a lot to discover your secrets, Great blog process
Now if you could only teach me to have TALENT, I could make tshirts!
Thanks for this, I can almost picture you running around NYC pulling out your notebook etc doodling...
the process sounds fascinating to me!
thanks, I so happy I can fascinate people with my work :-D
A2, ernsthaft?? Das ist... monströs! Übrigens ein sehr schöner Post wiedermal :)
BIG thanks 8)
Danke Klee - ich GLAUBE es ist A2, ich kenne die US Papiergrößen nicht. ABer bei shirt wimmeldesigns ja, da macht die Göße Sinn. :-D
Thx a lot for the post. Very motivating and pretty awesome to read about a different creation process especially coming from a great designer like you. Can you share the brush that you mencioned? My email is: pippi@pippi.com.br :)
You're the best, sweetie!
NIce!! blog
thanks, i'll try yours steps.
Love love love your stuff!!! There's no way you'd be willing to share that textured brush would you?
Post a Comment